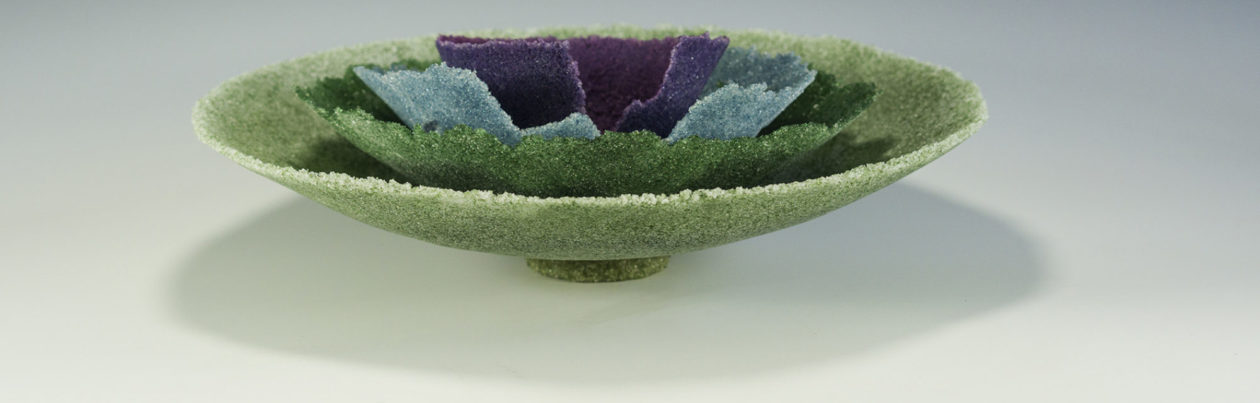
The beauty of the form, the inspiration of Antonette Badenhorst her process is an amazing journey at https://www.bing.com/videos/riverview/relatedvideo?q=burnishing+clay+youtube&mid=9C1FC481346438F4414A9C1FC481346438F4414A&ajaxhist=0
Also learn from this amazing artist at www.teachart.com
Recently there’s been two new additions to our family. Julia and a year later Nova who just turned 1 and Julia just turned 2. With the advent of covid it put me in to self imposed isolation and reflection. I worry what these newest members face in a world full of pollution. We all try and do our best to be eco friendly but the fast fashion industry is all about the sell and not the sustainability of our budgets and of planet. Fast Fashion generates 10% of air pollution with 10,000 garment being sent to the landfill every 5 minutes. @% of the garment workers earn a living wage. 80% of the garment workers are women. Washing synthetic fabric sends millions of plastic particles into the ocean.
This is not a Black and White issue of us ignoring our eco part in saving the planet. It’s undoing marketing and developing areas for sustainable fashion.
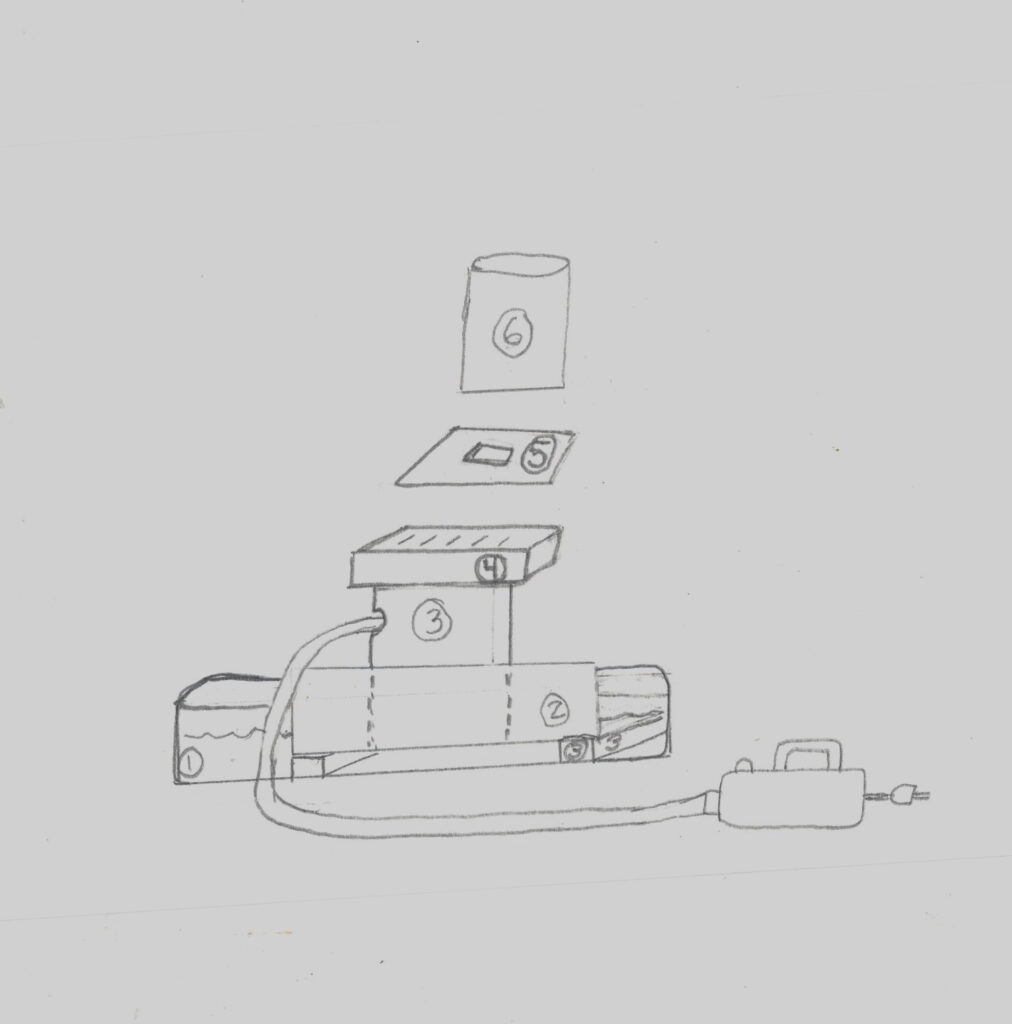
1. Disposable Turkey aluminum Roster Pan. 2. Disposable Lasagna aluminum pan 3. Sturdy Plastic or Metal Tube set on slats (1/4 to 1/2 inch) 4. Sturdy Grate (such as an irrigation cover) 5. Galvanized sheet thin enough to cut a hole so the steam hose can be directed into the mold. 6. Wax Cast Investment Mold ready to steam out 7. Towel to wrap around the mold and help reduce air leaks 8. A stick to pock the wax melting from the mold to keep the wax flowing out of the mold. 9. Wall paper steamer.
Most supplies come from a hardware store. The aluminum pans come from a grocery store.
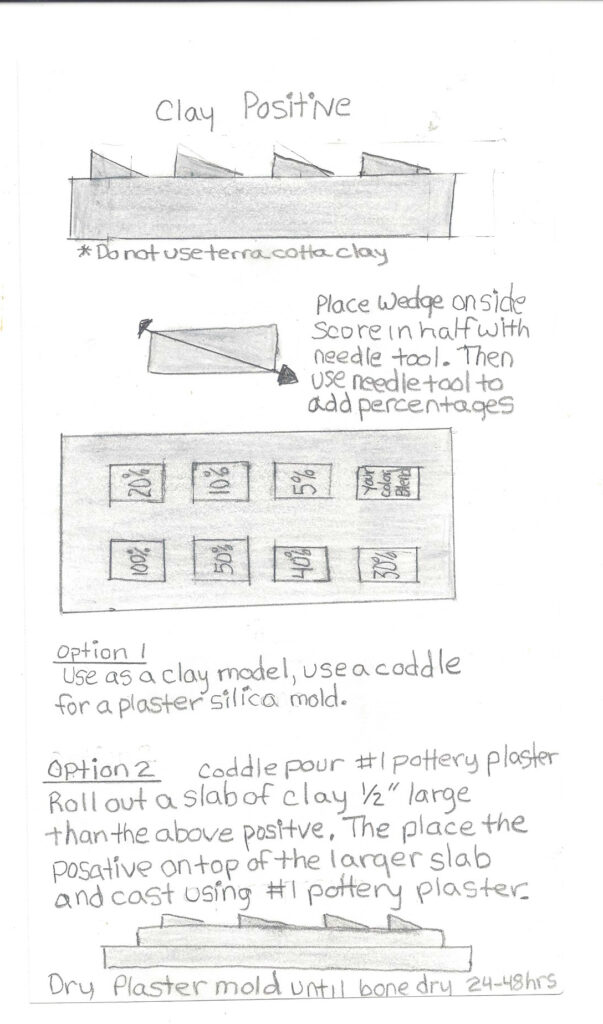
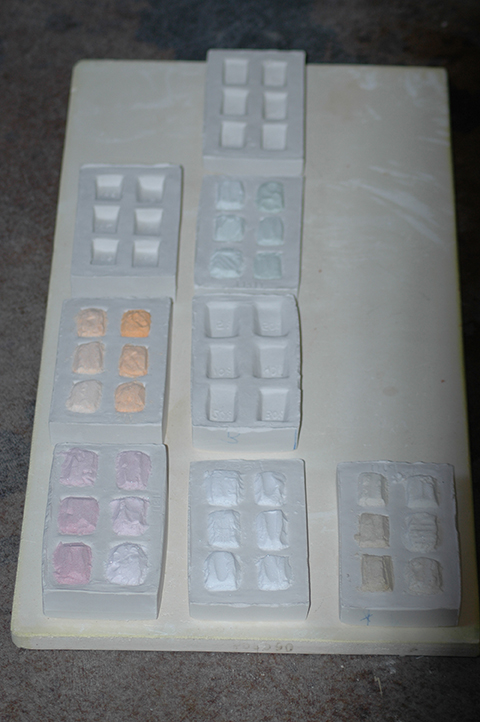
To get the colors I want for my pate de verre I need to test the various percentages of color to use concentration of colors for high and low highlights. As with painting in other media you have light and dark values of of colors. The difference in pate de verre is the process is reversed painted. As you build your layers you cover up sections and have to the intended look of drawing where you can list what to lay down as color first and then the following progression of color by layers. Option 1 is to use the clay and make a single use refractory mold of 1:1:1 (#1 pottery plaster, 200 mesh silica, water). Always add the plaster to the water. I have hundreds of colors that require the various percentages so doing an original model in clay (option 1) would be exceedingly time consuming so I opted to do a kiln load full of test tiles and used Option 2 To the clay positive, I add a base of clay under the positive then coddle pour a #1 pottery mold. Once the plaster as set up, usually 30-40 minutes the clay can be removed and the mold cleaned up then left to cure 24-48 hours depending on humidity levels.
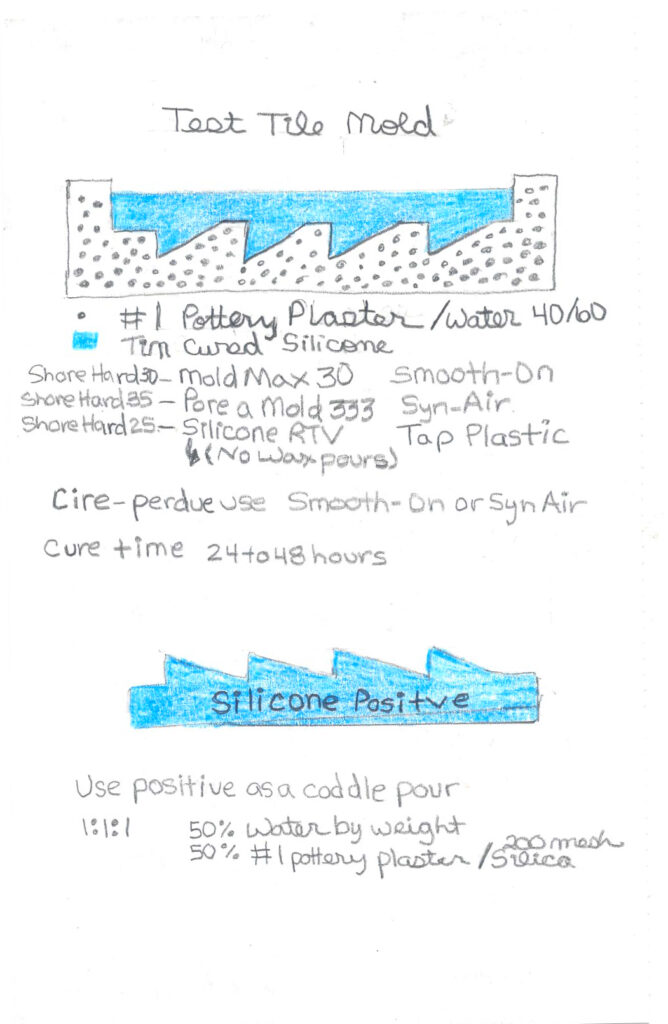
In the prior working method post you saw how to make a clay positive. This post expands on the versatility of mold making process . Option 1 you can create a single use plaster/silica investment mold and hand build or coddle pour a refractory mold. In option 2 you can make a pure plaster mold to help speed the working time from clay building hundreds of clay original models and instead use a silicone positive. This requires you to make a pure plaster mold and let it dry 24 hours. Then you can pour silicone into the plaster mold negative which then once cured (24-48 hours at 70 degrees) you have a silicone positive. Using a coddle you then make a #1 pottery plaster/200mesh silica investment mold. 1:1:1 or 1 part #1 pottery plaster added to 200 mesh silica and Water by weight. Using a silicone negative lets me reduce the time spent to get color samples for my art. This approach works well for thin pieces but the thicker the artwork gets the color become quite dense. The principle remains the same but the clay forms can change to allow for the direction work and the thickness of the piece and light you want to transmit.
You can make a #1 pottery plaster mold to create a silicone positive. The positive once cured gets to be used for a coddle pour of #1 pottery plaster and 200 mesh silica to make make an investment mold that can endure the heat of the kiln. if you have many test tiles to make using silicone positives really reduce the time spent to make simple test tiles of varying color degrees. While my tiles are thin I can vary colors concentrations to allow for high and low lights to the work. In the early 2000’s at a BeCon conference Jim Jones was the sales director doing a demo of frit tinting. As a pate de verre artist I was captivated by the concept. While the demo was a single color the idea can accommodate custom blends of your choosing and allows for creative variations to support the artistic need. As usual Bullseye empowers artist to springboard ideas and use their imaginations to tweak and provide artists a lot of artistic freedom. Here’s the link to Bullseye’s literature on frit tinting.
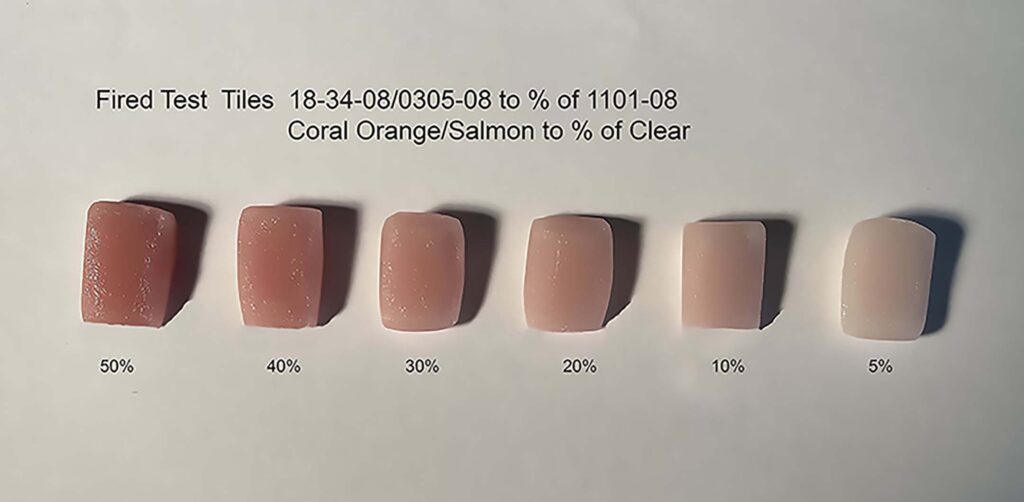
50/50 Color to Clear 40/60 Color to Clear 30/70 Color to Clear 20/80 Color to Clear 10/90 Color to Clear 5/95 Color to Clear
Colored powders were combined and mixed thoroughly in a lidded container with enough volume of color to use the base colored glass to a percentage of clear as shown above. Use a N95 respirator when using dry glass, especially powders. I tend to mix powders outside under cover as fine particles the eye cannot see remain in the air for 8 hours. Once the clear and colored mix is wet using a pate de verre glue. I have track lighting which is how I discovered the finest of particles in the air. Another reason to wet mop my area after doing art.
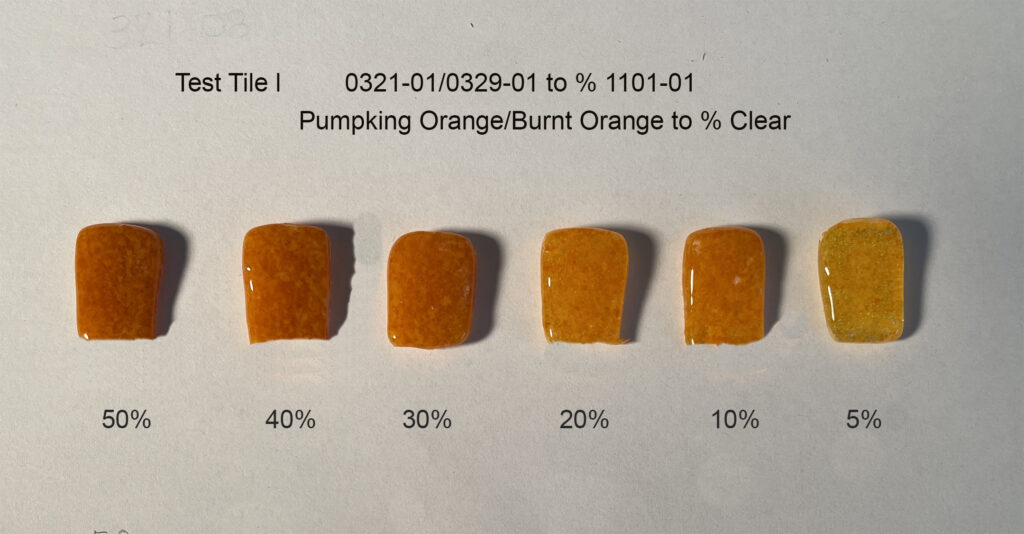
Colors to Clear Bullseye Frit. 50/50 Color to Clear 40/60 Color to Clear 30/70 Color to Clear 20/80 Color to Clear 10/90 Color to Clear 5/95 Color to Clear
Colored frits were combined and mixed thoroughly in a lidded container with enough volume of color to use the base colored glasses to a percentage of clear as shown above. Use a N95 respirator when using dry glass, especially powders. Once the frit is wet using a pate de verre glue. I tend to mix dry frit and powders outside under cover as fine particles the eye can not see remain in the air for 8 hours. I have track lighting which is how I discovered the finest of particles in the air. Another reason to wet mop my area after doing art.
Week 14 of isolation. I actually started distancing in mid February but due to an art installation I didn’t go into full throttle lockdown until the 2nd week in March.
After cleaning kitchen staples, navigating the on-line world of ordering food, masks and supplies I took on all those bothersome chores of around the house. It was a good time to be more mindful of using up left overs and applying some new moves in the kitchen cuisine arena. After burning my hand on the Le Creuset during a Sour Dough bake off that my enthusiasm waned. Luckily bread started showing up again in the store. It’s curious why the American food supply system failed us. Once I went local organic things began to improve.
Spring wasn’t cancelled due to Covid-19 so an intensive weed pulling exercise began in the lovely but large garden I have. It looked so wonderful up until all the spring rain brought back to life the weeds I’d so carefully dismissed.
I feel blessed I have a large yard so walking the dog and gardening still gets me exercise. It’s been helpful to not do the Covid 19 20 pound gain so many have done.
So now between cooking and cleaning I can finally get down to art. Whew, it took long enough. I’ve been doing botanical watercolors for a bit now and I started by organizing my paint, pencils and general supplies to make my next endeavor. My own garden is my inspiration so I want to document Spring in the Pacific Northwest. I will entitle the sketchbook Spring has not been cancelled.